Common Sewing tips-how to sew with a sewing machine
Hello! I am so happy you are here to learn how to sew in the way that is easy, green, modern and fun with Common Sewing’s New Basics Beginner’s Series! First things first, let’s get you comfortable with your sewing machine. Whether you are brand new to sewing .. or you have tried it before but kept jamming up your thread and gave up .. or you are a good sewist but want to learn a few more things .. Common Sewing’s New Basics Beginner’s Series is designed to build in you the most basic HABITS that will equip you to sew with ease and grow joyfully in this beautiful craft.
So many of my students have told me that they would never be able to sew, they tried it before and they always jammed up the thread. I always assure them that it isn’t their fault, they just didn’t learn the basic HABITS that would allow them to sew with ease and pleasure. I have focused heavily on the HABITS at the beginning of sewing that will allow you to run your machine smoothly. If you slow yourself down here in the very beginning of your creative journey and learn what your machine needs from you before you begin, you can make absolutely anything. I promise. If you want to make a wedding dress or hand tailored suit, you will have to put in a few years of growth and practice. But you can. If you want sewing to be a part of your lifestyle so you can tend to the textiles you live in and build some lovely things you have dreamed up, you will be able to realize that dream during your 6 project New Basics Beginner’s Series starting now!
I promise you that I have made every ‘learning opportunity’ (mistake — but we don’t say mistake here) that you will make. I started sewing when I was 9 years old. My meemaw Willie would sit me down at her old oak table and keep me company while I made project after project. I loved this craft with all of my heart from the moment we started. I felt peaceful, my imagination was on fire and when I finished a project — even a ‘creative’ (botched — but we don’t say botched here) one I felt proud and capable. Sewing was really good for me. I went to college, and both times in my undergraduate when I studied abroad I packed a sewing machine and more supplies than books or clothes when I went to study in England and then in France. And when I was offered a seat at my dream university to do a PhD in literature, I declined my spot for a year to think things over. I moved to Austin, TX and opened a little make-anything-tailoring-shop and that year away from school turned into the creative life of my dreams. I never looked back. I moved on to NYC and started a custom tailoring business in the old Andy Warhol factory building in Union Square and I made rock and roll stage clothing. I was featured on the cover of the NYTimes Sunday Styles Section for my collaboration with musical artists to create wardrobe. I found an agent and started traveling on fashion photo advertising shoots. Heavens I LOVE the exploding energy of a team of creatives at the top of their game who come together for a handful of days to create in harmony images that will impact people all over the world. Still thrills me. When it was time to slow it down and start my family, I moved to Orlando, FL and built a workroom that consulted on design for installations in all of the Disney parks locally and designed and built Disney character costumes for parks and resorts worldwide.
I got everything I needed to do all of that sitting next to my grandmother sewing a series of projects that started simple and got slightly more complex as she led me through them. She taught me habits. She taught me to become familiar with my machine. She taught me to take my instructions carefully one at a time. And she promised that someday I could do anything. And I want to share that with you.
So to get started you need a few supplies.
Working sewing machine. If you have been given one or borrowed one please have it serviced before we begin. So many newcomers give up because their machines are not timed up and they think it is their lack of skill. That breaks my heart. Sewing machines are simple but delicate machines that must be timed to work.
Spool of GUTERMAN thread. It is the best and most reliable thread. 100% polyester all purpose. Please do not use old thread. It degrades with time like all fibers and you are learning. You need good tools to let you make your own ‘learning opportunities’ We will talk about color matching in the Basics Series. For now any color will do.
CORRECT bobbin for your machine. My little workhorse Janome 2212 only works with the bobbins made for it. And there are so many bobbin styles. I recommend as a beginner to only use those that came with your machine or take your machine to a specialty shop so a pro can set you up with the right kind. We want your machine running smoothly.
scissors or snips. I will outline the basic toolkit of reliable, enjoyable, affordable and top quality tools that I take on the road in the Basics Series. For now, any scissors or snips will do.
Manual. If you have the one that came with your machine .. amazing! If you don’t, every manual in the world is currently downloadable in pdf format from the internet. Please, before we begin, download your manual if you don’t have it. Every sewing machine is slightly different so I will ask you to refer to your manual as I show you how I use my machine.
Practice stitching guide Printed out before we begin
This written tutorial is meant to accompany Common Sewing Tips - how to use a sewing machine. The video will go quickly over the machine and I will use this text to give more specific information. It will be best if you can access both. If you have two devices you can read on one and watch on the other. Or you can print this information out in PDF format. I expect you to pause me a lot while you play with your machine step by step. When we are done, I want there to be no mysteries with your sewing machine. So, let’s hit play and take the beginner’s oath…
First things first, anything you see in bold is important and I want you to notice and/or remember it. Let’s turn the machine on and get comfortable. Find your foot pedal & plug and find the socket on your machine. Tailor’s tip always keep an extension cord handy. Never ever set yourself up to sew in a way that is awkward or uncomfortable. Always have an extension cord so your cord can be out of your way and you won’t trip over it, good lighting, and a little trash bin. Believe me these 3 things will make all of the difference. Plug your machine in and put the pedal on the floor. Make sure that the lightbulb in your machine is working; it should turn on when you turn on your machine. With your hand out of the way you can push your foot on your pedal and see that your machine is working. Notice three things your machine does while it sews 1. needle goes up and down 2. thread take up lever goes up and down and 3. the handwheel on the side rotates toward you.

Every manual should have a page that looks like this; it should name every part of your machine.
So let’s go through what makes your machine sew part by part.
Handwheel. My handwheel is on the side of my machine. It basically makes the machine sew manually. Go ahead and turn your handwheel toward you and watch what happens. Needle goes up and down! The handwheel does the same thing as the foot pedal, just slower. Treat your handwheel like a dear friend and always bring it toward you. Of course you can turn your handwheel away from you. Especially in the beginning when you want to back up it is tempting. But you will jam up your thread, and you will need to stop, drop and rethread everything If you can get used to turning your handwheel toward you, you will sew just fine.
Reverse Lever. You will want to find this button and then push it lots of times. You will use the reverse lever every time you start or finish a stitch. Just get your hands used to finding it!
Stitch length dial. This chooses the length of your stitch. The larger the number the bigger the stitch. Big stitches are loose and weak. The smaller the number the smaller the stitch. Small stitches are tight and strong. I use stitch length 3 with my students. It is good and strong but easy to pluck out. There will be plucking. Commercial garments use 2.5. We aren’t there yet.
Pattern selector. This one is fun. This chooses all of the types of stitches. Play with this as much as you want; reference your manual to know what tension each stitch needs, what needle it takes and what it does. In the beginning of my sewing journey, I loved all of the stitch possibilities. Nowadays, I use straight stitch, zigzag and buttonholes.
Thread tension dial. Just like a good relationship, sewing functions on different types of positive tension. There are two spools of thread involved in every stitch - a top spool and a bobbin - and every stitch is a tiny knot tied with a specific tension. All of creating is using the right tension at the right time to hold things together beautifully. Poetic, right? The higher the tension on your tension dial, the tighter the top thread will hold. The looser the tension, the looser the top thread will hold. Different fabrics need different tensions. But 75% of the time, you will sew on a middle tension - 4 or 5 - to create a strong and beautiful stitch. We will begin to play with tension in Basic #5 Gigi knit tee.
Presser foot. Your presser foot must always be in the down position when stitching. Always. If you push on the foot pedal and begin to sew with the presser foot up, you will jam up your thread. And you will stop, drop and rethread everything. Find the presser foot lifter and play with that until your hand is used to reaching for it. Your machine has many different presser feet for different projects. We will play with changing presser feet in Basic #2 - zipper clutch. For now, find the presser foot release lever and drop your presser foot. Look at it and notice that there is a bar in the middle. That is where your presser foot lifter attaches the foot to the machine. Put your presser foot back on (following your manual) and drop it and put it back on until you are used to it. You will do this a lot once you get going so might as well get comfy with it now. I tend to sew like a monkey on a motorcycle sometimes and sometimes my presser foot just pops off. No worries. Nothing is broken. I just put it back on.
Needle. Lower your presser foot to the ‘sewing’ (down) position. Turn your handwheel towards you - like a friend always bring your handwheel toward you - until your needle is at its highest position. Reference your manual to find your needle clamp screw. Hold your needle with your left hand and with your right hand turn the screw toward you. Your needle just fell out, right? That is because you need to change your needles for different fabrics. AND if you sew like a monkey on a motorcycle sometimes you will break needles. No worries! Just replace your needles. I have hundreds of needles in a little zipper bag when I go on shoots. I sew fast and blow through them without so much as slowing down. Feel your needle. Do you feel that it is round in the front and flat in the back? When you put a needle in your machine, it goes flat to the back. Push the needle in as far as it will go and turn the screw away from you. Do this a few times until it feels comfortable and familiar.

Let’s thread our machine!
I will be showing you how I thread my sewing machine, but I want you to follow along with your manual. Threading your machine is the most important thing you can do to assure smooth sewing. It is simple and it is specific. If you memorize each tiny step here in the beginning, your journey to being a maker will be much more joyful.
I am going to pull out my thread now and keep my empty bobbin close. I will be winding my bobbin with my spool of thread, because I want my top and bottom stitch to be the same color.
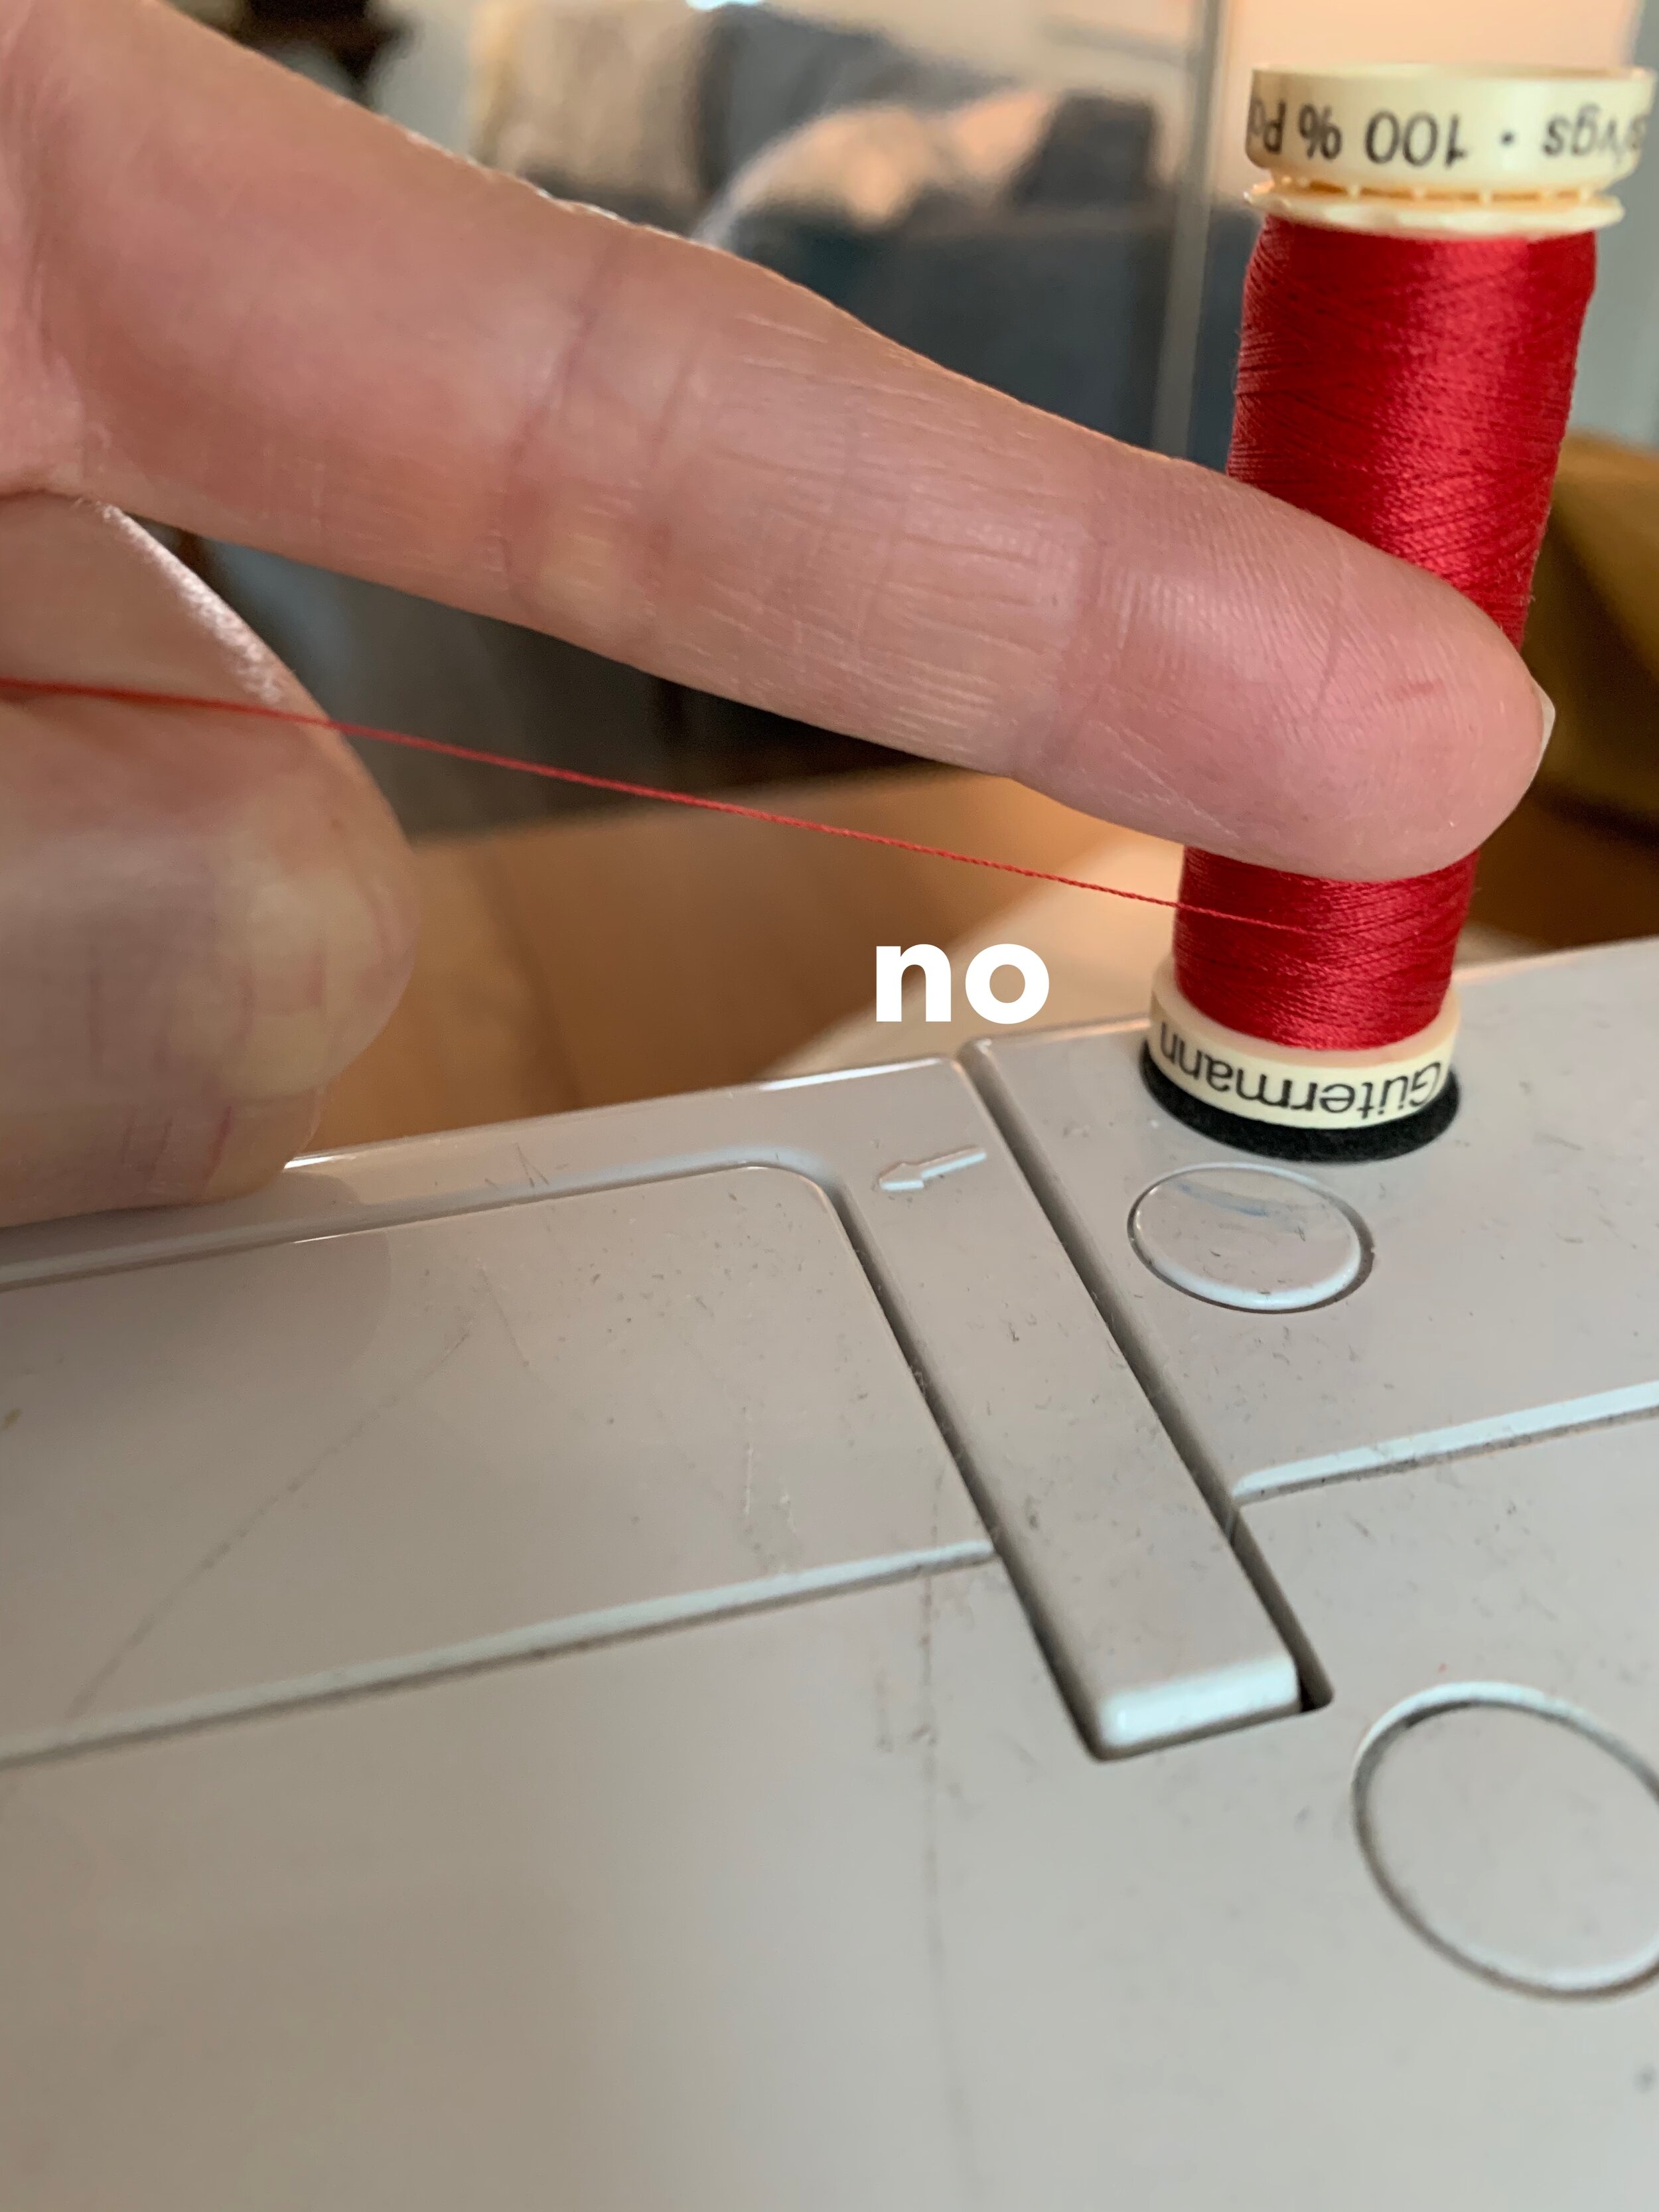
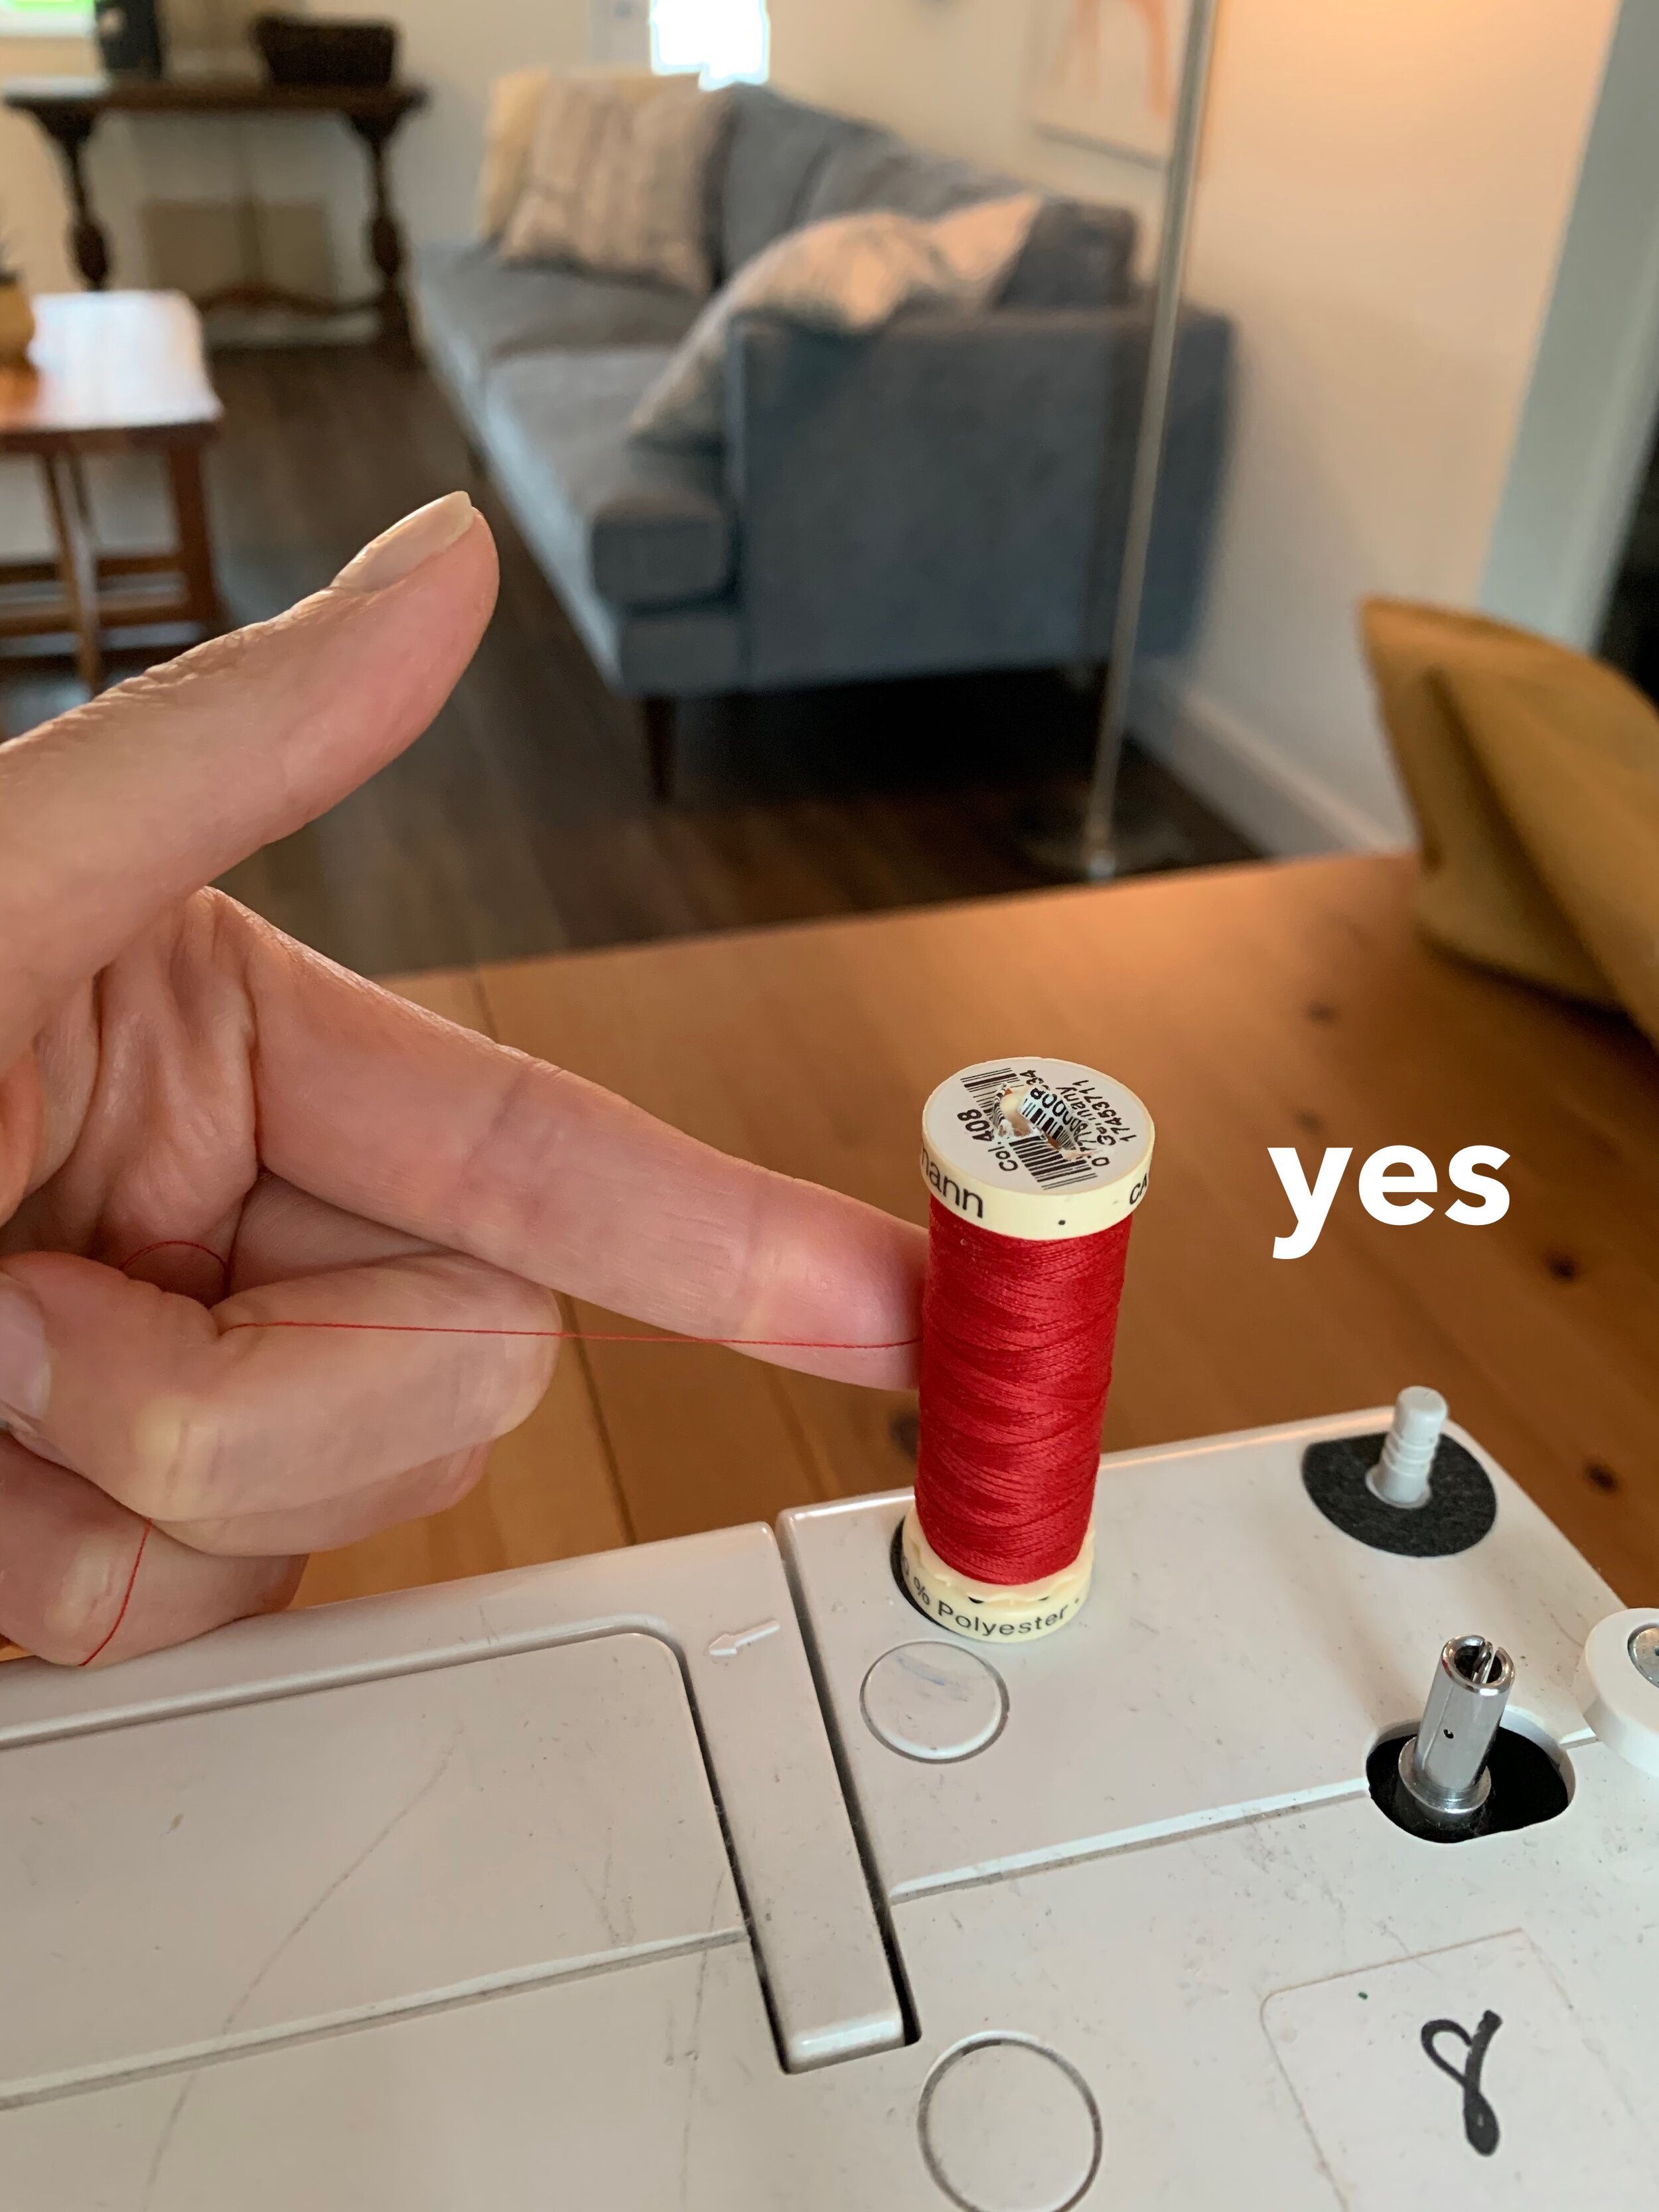
My machine has its spool pins on top. They retract. Find your spool pin and put your thread on it. My machine is specific that the thread should unwind from the back. Not the front. Check with your machine and see what it likes. I learned this 15 years into my career as a professional photo shoot tailor. I looked at the manual. Blew my mind. And I jammed up a lot less thread.
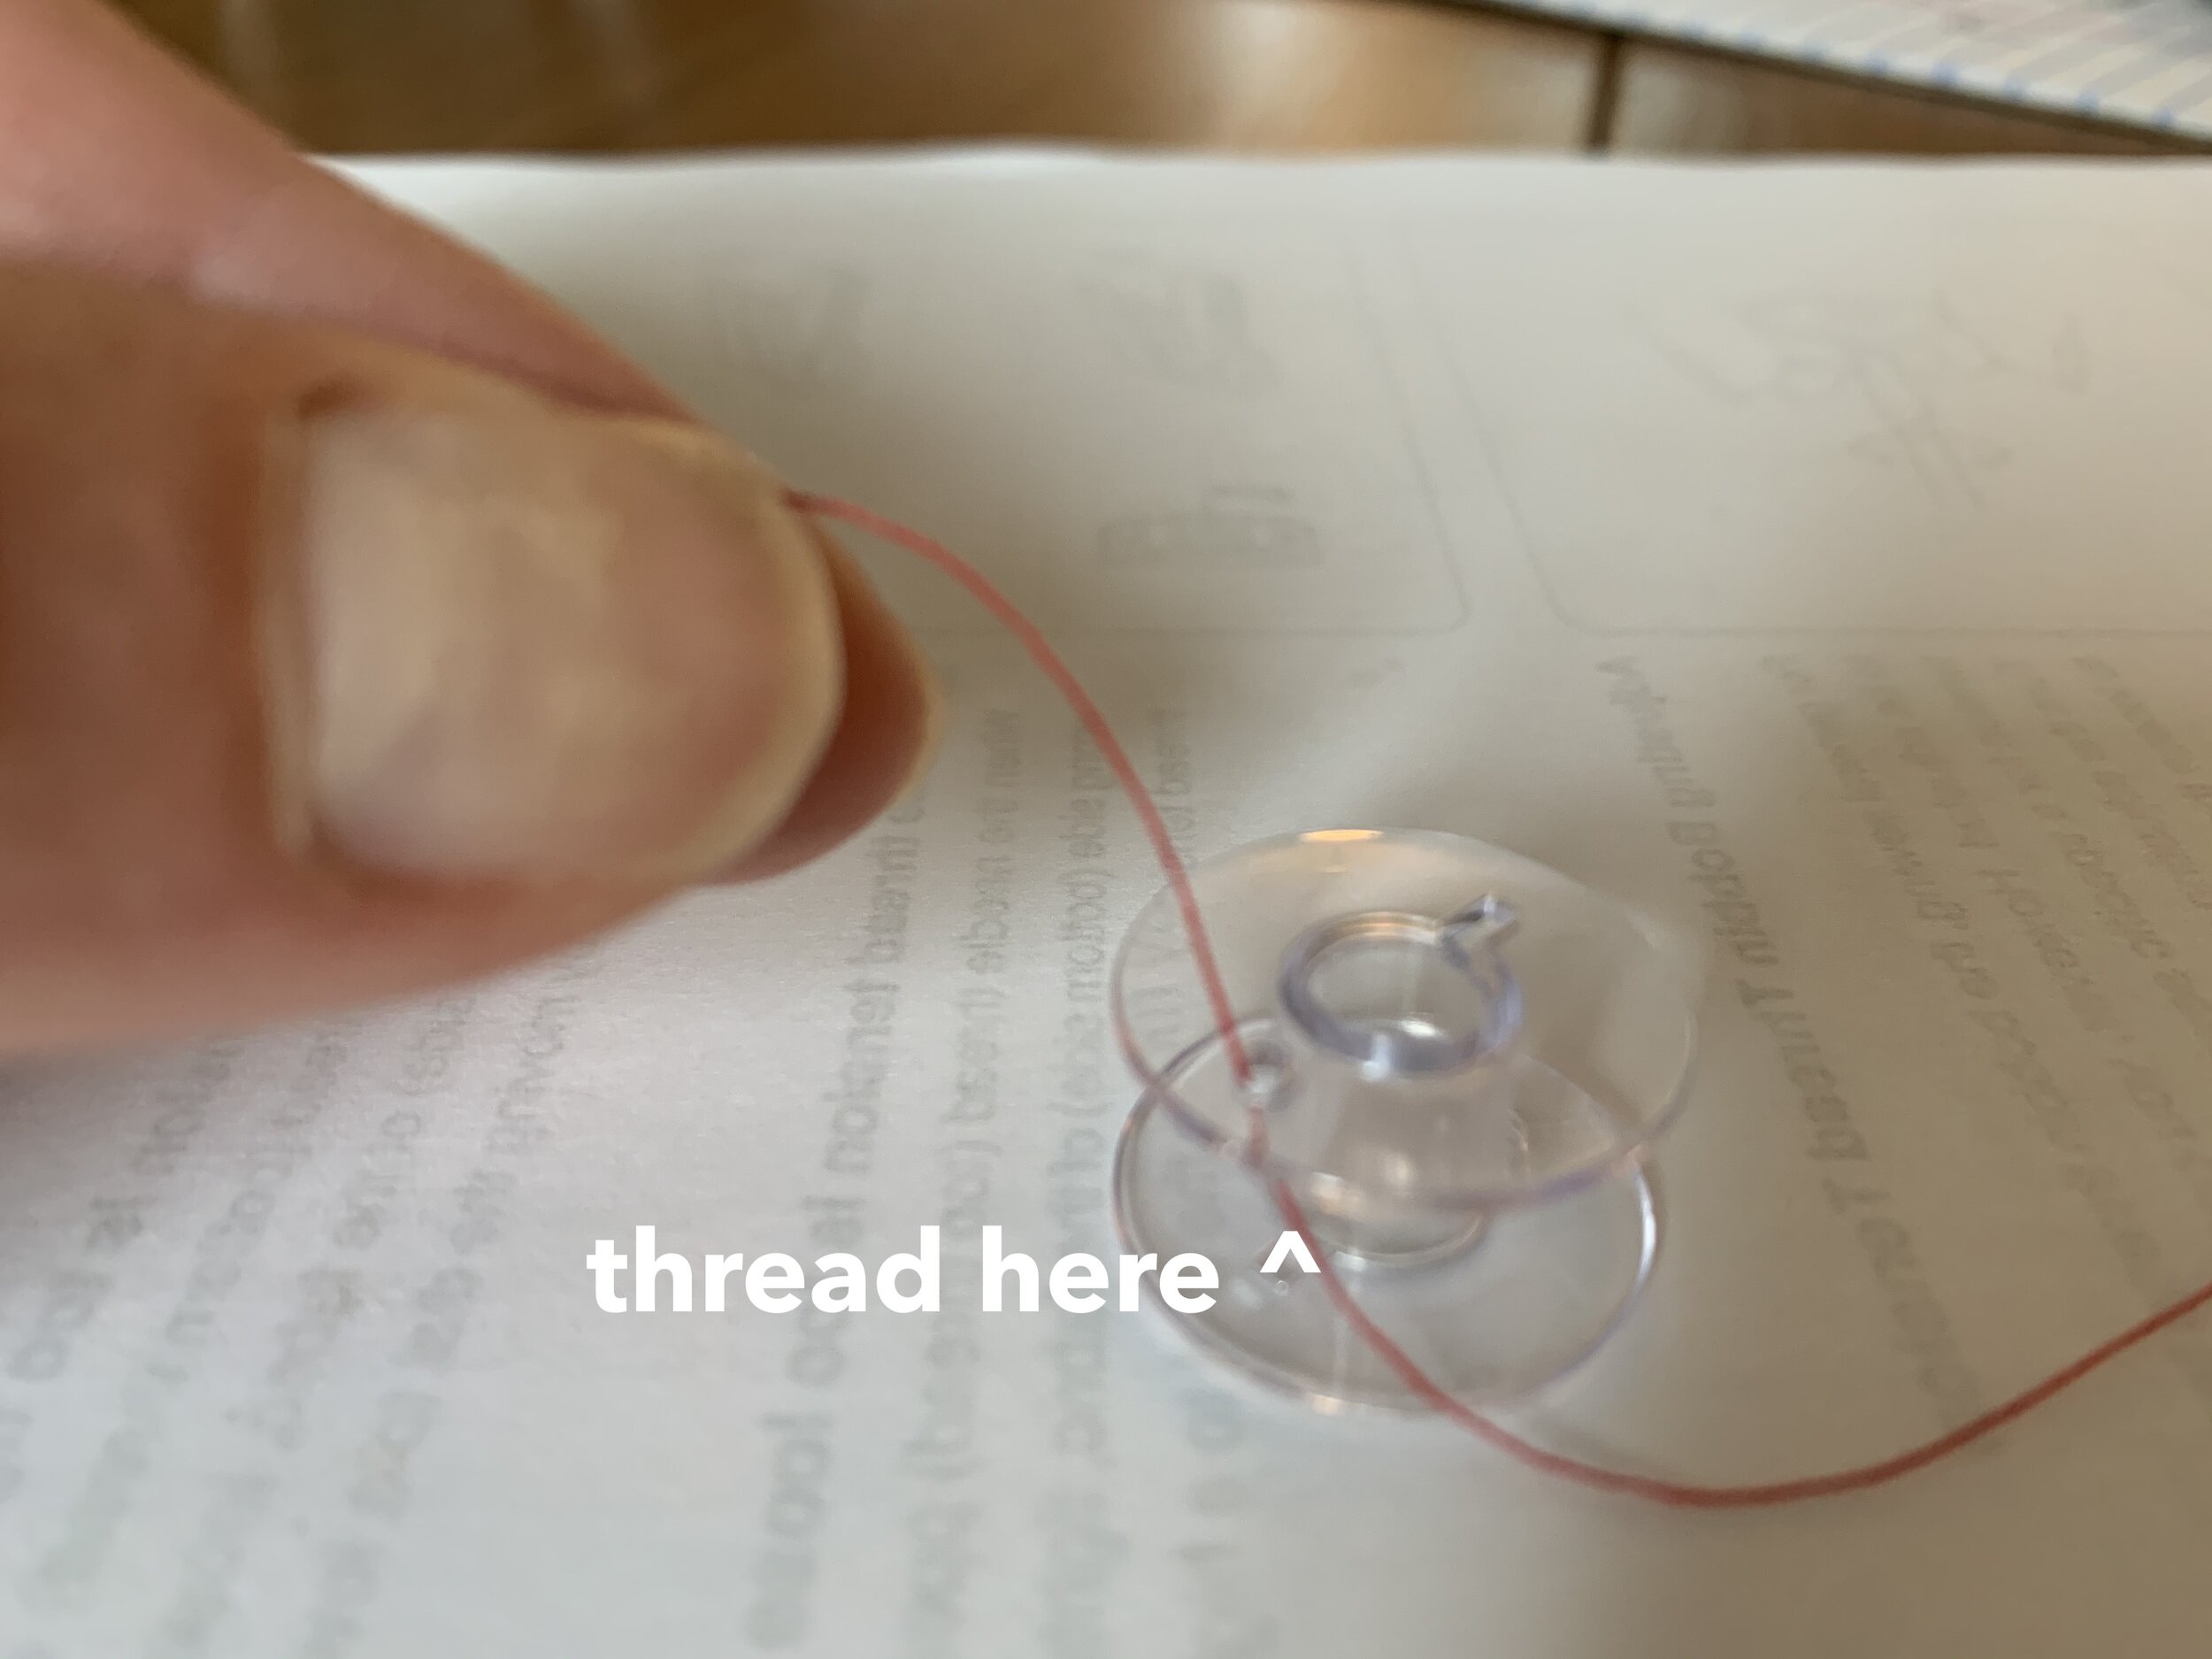
Now, with my top spool on the spool pin according to my manual, I am going to attach my thread to my bobbin so I can wind it. Find the tiny hole in one of the bobbin discs. Start your thread between the two discs and feed your thread through that little hole. This is confusing at first but you will get the hang of it. You need to create a thread tail to hold on to while you begin winding your bobbin. Hopefully these photos will help.
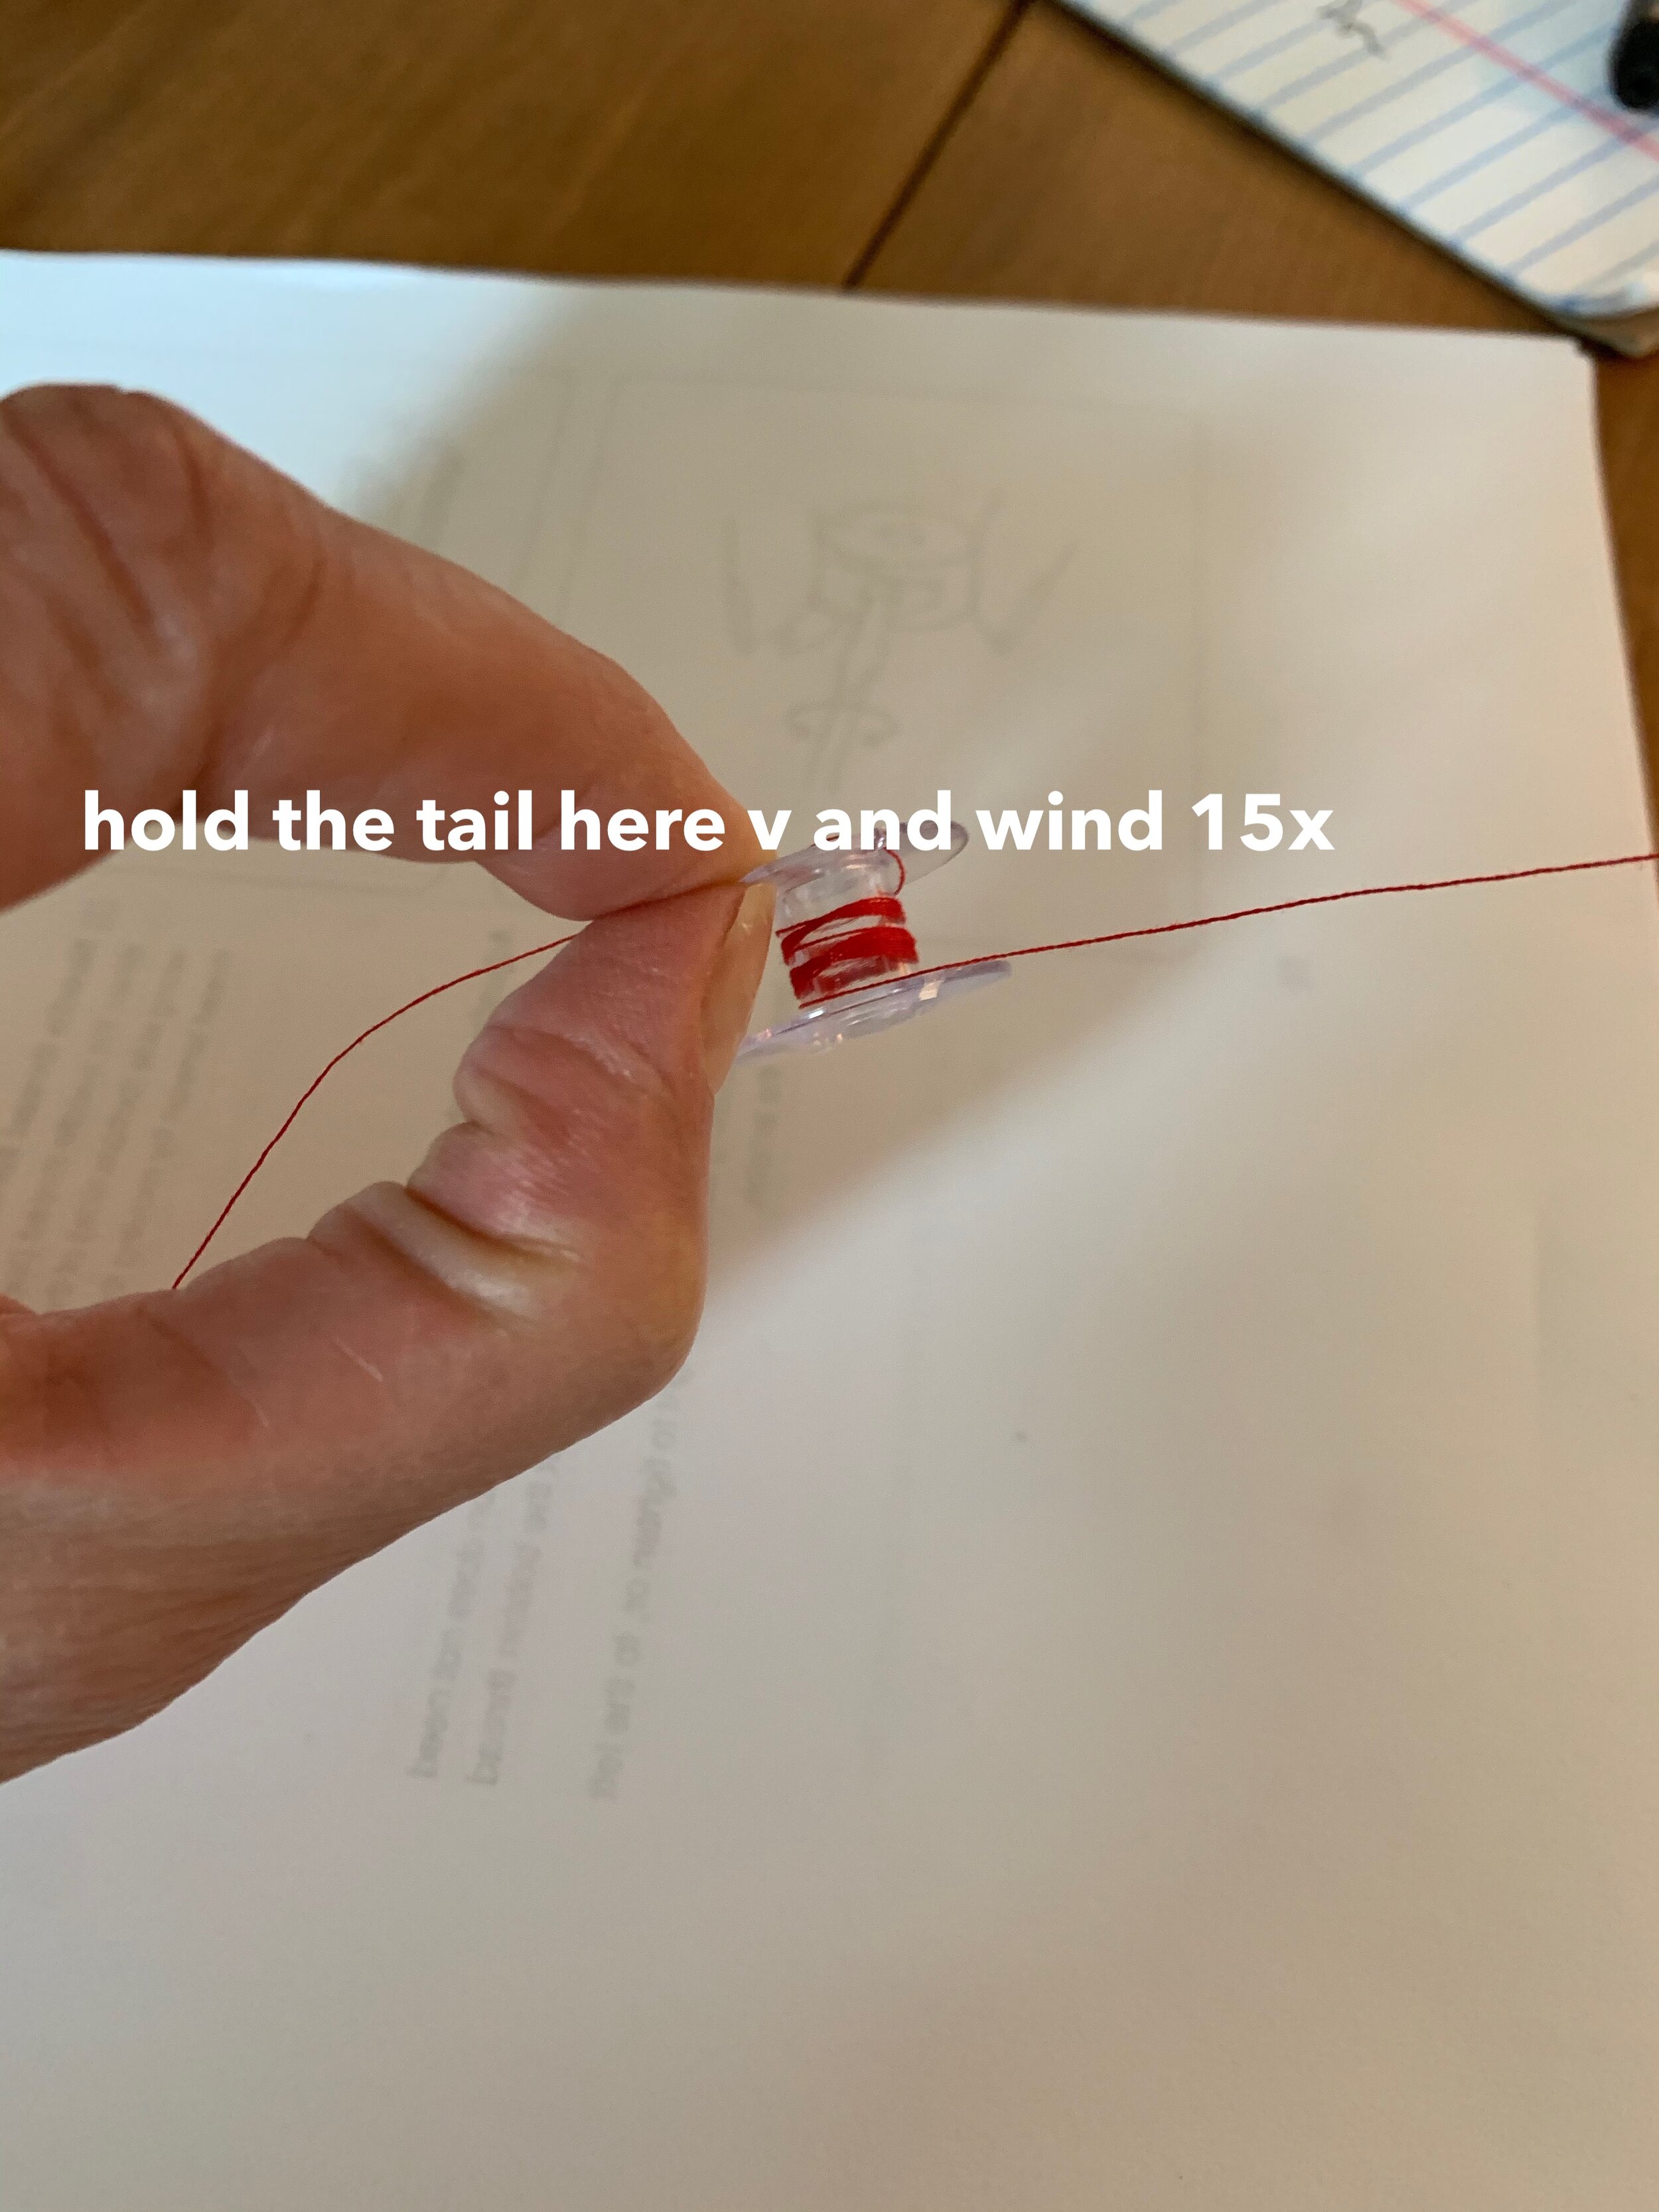
Manually wind the bobbin at least 15 times. Guide your thread through the bobbin winder thread guide and place your bobbin with the thread to the back on the bobbin spindle. Pop your bobbin to the right toward the bobbin stopper until it clicks and on my machine I pop the handwheel to the right to tell my machine I am in bobbin winding mode. Check your manual for what your machine wants you to do. Hold that thread tail with your hand, put your foot on your foot pedal and press lightly. See how your machine guides the thread just right to fill your bobbin evenly? Isn’t that delightful? Just fill your bobbin until it is half full. Your bobbin stopper will stop your bobbin winding when it is full. For our purposes we don’t want to wind our top spool down to nothing:)
When you are done, pop your handwheel back in to place, pop the bobbin spool to the left and remove your bobbin. Snip the thread that connects your top spool to your bobbin.
Let’s thread our machine! Every machine threads slightly differently, so keep your manual handy. I recommend printing a copy of the threading guide, maybe give it a little laminate, and keep it with your machine until you have it memorized. Properly threading your machine is the most critical thing you will do. It is simple and basic, but there are a number of steps and each one has to be followed as your machine specifies.
Let’s thread the top spool now. You can watch me thread my machine on the video. Then following your instructions exactly, thread your machine. I recommend you thread that top spool 10x right now to start to get the hang of it. In the future this will all be second nature, but right now you are learning.
Let’s put our bobbin in our machine. My machine has a front loading bobbin. Refer to your manual to see what kind of machine you have, front loading or top loading. I remove my extension table to access my bobbin. Find your extension table and pop it on and off a few times to get the hang of it. When you sew without your extension table, you are free arm sewing. Watch me insert my bobbin into my bobbin case and then draw the thread up on the video. I am going to put the photo here that explains the thread orientation when you put a bobbin into a free bobbin case.

When putting a bobbin in to a free bobbin case, mind your p’s and q’s. If your bobbin looks like a q, you will sew quality. If it looks like a p, you will sew like poop.
Once your bobbin is in your machine, you use your needle to sweep the bobbin thread to the top of your machine so you can begin sewing. Your machine won’t sew if your bobbin thread isn’t above the needle plate. Use your handwheel to lower your needle slowly. turning the handwheel toward you of course. Loosely hold your top thread with your left hand at 3 o’clock on your needle plate. When your needle is almost at the highest position, gently pull your thread and watch the bobbin thread pop up! Pull your bobbin thread out and lie the two threads together at 3 o’clock on your needle plate.
You are ready to sew!!!!!
Now! Pretend that your printed PRACTICE STITCHING GUIDE is a piece of fabric, and let’s try this out! Jump over to Common Sewing Tips - how to sew to practice with me!